Sunday, June 24, 2007

Better Living With Chemicals---LOS

Posted by Picasa
Remember doing the "egg thing": putting copper wire in a plastic with a hot hard boiled egg and smashing your frustrations away? We were trying to oxidize, or create a lovely brown patina, on copper pieces with the sulfur from an egg's yolk.
For those of you with less violent tendencies there is another alternative, LOS (liver of sulfur). I flunked high school chemistry so I can't tell you much about it but I found this great tutorial by Stacie Florer (sorry, but this tutorial has been removed by the designer). You will see all the good stuff as well as how she creates a beautiful pair of earrings.
One note: this clasp was inspired by Connie Fox's tutorial on wire clasps.
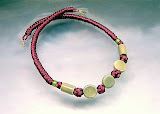
And, of course, notice the spiral design of the kumihimo braid.

Thursday, June 21, 2007

Jewelry: Tonight's Burning Question


Posted by Picasa


Tonight's burning question is: why is your favorite piece of jewelry your favorite?
As I was poking around my Kirengeshoma (Hah! Got something personal about me in before the end of the first paragraph. Don't you just hate hearing about personal stuff that has nothing to do with you? Now you have to go and look up "kirengeshoma". Hah again!) I was thinking about an important question all jewelry designers ask: what makes a piece of jewelry your favorite? You get 30 seconds to think before I tell you about my personal favorite, and more importantly, WHY?
This is my favorite necklace: kumihimo, of course, done with traditional Japanese silk, and some large holed turquoise-look beads.
But the hardest thing is to figure out why it's my favorite. Well, first, it has some of my favorite colors: blue, black, green, and gold. Blue and gold is a killer combination. Next: it's perfect to wear with a black turtleneck. Black is the perfect color to show off any piece of jewelry (remember all those black velvet boxes with diamonds in the at the jeweler's store?).
Finally, and perhaps most importantly, it suits my face shape (rather broad and...fat). The length draws your attention away from my face and directs it toward this gorgeous necklace, thereby creating a more beautiful me. What more could you ask for?
In a nutshell, jewelry designers ask this question every time they create jewelry for potential customers. Find the answer and they have a guaranteed sale.

Oh, something you will never hear: "Be honest, do these diamonds make me look fat?"

Friday, June 15, 2007

Braids, braids, braids!


Posted by Picasa

These are a wide assortment of kumihimo braids made with my handy dandy Kumihimo Disk, from Hamanaka (the rest is in Japanese). The disk came from www.satincord.com.
What isn't obvious: they are all the same design structure, "Kongo", which means "hard as a diamond". So far, I haven't been able to see the diamond thing but I'll keep trying.
The Kongo braid is made by the same two moves, up and down, around and around, turning the disk between each move. But vary the colors, color placement, thickness of the fibers or cords, and you have an almost endless variety of different patterns. There is even a flower braid, (look at the two middle braids).
What you see are braids made with satin and rayon cord, embroidery floss, and silk. The silk comes from www.braidershand.com and is the traditional fiber of Japanese braiding.
Hopefully, next time, I'll get a good photo of my maru dai (Japanese braiding stool) which is the traditional braiding equipment. I'm still working on that photo editing thing.

Necklace: As Pretty as a Picture...Again


Posted by Picasa

Just to show what good things can happen "when you know to stop NOW" (Forget just saying no, just say "when".)

To get this nice photograph (well, I think it is) I took several new photos using several camera settings, including Macro and Manual focus, changed the EV (Exposure Value for those who know camera geek stuff), rearranged the necklace beads to be all in line for a more uniform appearance, and snapped away.
This time I used Picasa, a free down-loadable program, and five quick minutes later came up with this photo. Now, there is ALWAYS something that could have been done better. In this case I could have increased the color saturation to bring out the green of the beads better.

But, all in all, this is a pretty good photograph of my necklace that I won't hesitate to put up on my website. Okay, maybe I'll get to that green thing.

Now: to get my website up and running, or selling, which is the aim of any artisan jewelry designer (Duh!).


Monday, June 11, 2007

Pretty as a Picture


Posted by Picasa


While we are on the subject of knotting (actually knotting makes me happier than...well, chocolate, but try wearing that), this is a necklace with double Button knots, two single Button knots, and the Snake knot. And of course, very large holed beads.
The Snake knot is aptly named. It consists of two cords that wind around and around each other. The double Button knot is a test of patience and manual dexterity; it's made the same as the single knot but you run the second cord around and through, next to the first cord. (Or you can tie with two cords at once and be very careful to keep the two cords laying flat, around and around the knot.) Note: two cords run the full length. This means the single Button knot has a cord running through the middle of it. And, both cords run through the large holed beads. And in case anyone wants to know, I use nylon rattail from www.satincord.com.
Again, Suzen Millodot's "Chinese Knots for Beaded Jewellery" has great instructions.
If you look carefully at the picture you will notice that it looks almost like a painting. And this brings me to the subject of this post: overuse of photo editing programs. There are many excellent photo editing programs out there. You are limited only by your pocketbook. The hard part is knowing when to stop!
Now, I started out with a simple pic of the necklace. The background was wrinkled (plastic, I think) so I "smudged" all those little lines. (Sadly, life has no "smudge" function.) I have an art background and found I could put in some really nice "brush strokes". And, put in more shadows. And add a bit of character to the empty space around the necklace. (Rembrandt couldn't do better). Enhanced the colors a bit, more warmth, more red, and got the green a better shade. Sharpened up the edges a bit. Oops, color bleeds into the white. A little more smudging.
I did this about three months ago. I know much more these days.

There are some important things to know in order to make a good photograph.
Briefly: a digital camera with at least 4 mega-pixels resolution and macro mode (really CLOSE up pics), good lighting (very hard to get right), a tripod, and lots of patience (and maybe a very colorful vocabulary, "colorful", get it? Oh well).
And the most important: the know-how. All the editing software in the world can't make a bad pic into a great pic (in my case, since my aim is to sell what I'm making, the pic has to be reeeal gooood). You can Google digital photography. Www.tabletopstudio.com and www.createapendant.com are two that come to mind. The info and tutorials are excellent.
If anything, I have learned: the best camera and the best editing software can't make up for knot knowing when to stop. (Oh dear, too many knot jokes, I do knot know when to stop.)
That's all for tonight. Braids next time!

Saturday, June 9, 2007

To Be or Knot to Be...Then What?


Posted by Picasa


That's a very good question! I think some one asked that a very long time ago, but he had his own problems. My problem: how to tie this incredible knot, one of my life's ambitions. (Yes, I know this is a rather odd ambition, but we all have something weird we want to do before we die. Sky diving is NOT on my list.)


This is the Pan Chang knot. Lydia Chen, in her book "Chinese Knotting", describes it as "one of the eight Buddhist treasures. It twists and turns...representing the cyclical nature of all existence".


Suzen Millodot, in her "Chinese Knots for Beaded Jewellery" (English spelling), adds: "...it also represents the mysteries of the Universe and is also known as the Mystic Knot. As such it is considered to bring great fortune to the wearer and beholder alike." After three months of getting really frustrated I took a good long look at her directions. Suzen suggests starting out with two colors of cords so that you can follow the overs and unders, pulling loops here but not there. ("Duh!" experience. Ms. Millodot's illustrations are the best I have found, I just need to learn to read the whole paragraph.)


Click on the photo and what do you see? A flat piece with loops? WRONG! After weaving the cords in the right directions, you start to tighten the knot up by pulling the loops in a special order. Wonder of wonders, the tangle of cords becomes a two-layered structure!


My original idea was to hang a stone pendant from it, and now that I look at it, what a great idea! I will add a few Button knots, maybe some large holed beads and a clasp. (Check out the photo again and you will see a Button knot on the very top of the Pan Chang knot.) So, in the future when I have some spare time (who needs to do housework, anyway?) you will see a completed necklace. In fact, I already have a pic of a necklace with double Button knots and the Snake knot. Of course I may have deleted that at the same time I deleted this pic.(Had to re-post this. Aaaarghhh!)

Sunday, June 3, 2007

All Bright and Shiny Again! (Almost)


Posted by Picasa


The story continues: Now I have the beginnings of a copper clasp and some tube beads. Here you see: a bright and shiny tube made from untreated copper; a small hook and tube that have been oxidized but nothing beyond that; and a hook and larger tube that have been oxidized and tumbled to remove the oxidation from the high spots. Notice that the small "S" hook and small tube have no shine. But the other "S" hook and larger tube do have highlights (kind of like getting your hair highlighted at the hairdresser). I also used a Moonshine polishing cloth on the last two pieces to bring get a little more shine.


Copper is a soft metal, great for wiring, not so great where strength is needed. You don't want your necklace to fall off because the clasp let go! Copper pieces can be "work hardened" by tumbling them in an ordinary rock tumbler. It's the same as when you wiggle a can lid back and forth until it breaks off. The metal will bend only so many times before it gets hard and breaks. AND tumbling removes a good part of the oxidation while you can be doing something else, like watching "Judge Judy". I put these pieces in my tumbler along with stainless steel shot, enough water to cover all, and a drop of Dawn liquid detergent. And then tumbled away for 30 minutes. (One TV court show.)

Last thing to do: more tubes and a complete clasp. The problem here will be how to attach the clasp to the braid neatly and look really cool. Fortunately, there is a full day's schedule of TV court shows.


Friday, June 1, 2007

Which Came First...the Bead or the Egg?


Posted by Picasa

Odd question, isn't it? The answer involves the nature of kumihimo, Japanese braiding.
Remember, the beads must either have large holes or the braid must be slim enough to go through regular beads (possible, but then you lose the beauty of the braid's structure which is the purpose of braiding in the first place). Pendants are easy, you can hang them from a bail. (Future post.)
Make your own beads. Of course! For this I must thank Penny Cox for good info, (her site www.pcoxstudio.blogspot.com). We met while I was teaching at my first bead show, Bead Fiesta. Penny works with metals. She was teaching how she works with copper. She flattens it, oxidizes it, and winds up with a beautiful piece of jewelry.
I already had beautiful beads, courtesy of The Beaded Lily, but wanted something special to complement them. I have a lot of wire and some is copper. And now I have copper wire spacers and a clasp.
Using 20gauge copper I took a long piece, doubled it, put one end in husband's vise and the other in his drill (I have been dying to try this), and turned on the drill. It twisted the entire length of doubled wire. Using this twisted wire, I wound it around the shank of a crochet hook to get a tube shape. I twisted some more wire and tried fashioning a couple of clasps (from Connie Fox's web site, she is a wonder with wire).
Now for the ickky part: darkening the copper. You need sulfur to oxydize the copper metal. Some artisans use liver of sulfur (LOS) and some use an egg. An egg's yolk has enough sulfur to do the job. Boil the egg. Take a Ziploc bag and place a paper towel inside and put the copper pieces on the towel. After the egg is done, and while it is still hot, place it (don't bother peeling the shell off) in the bag. Then mush the egg, break it up and make sure the yolk is exposed. I left mine on the counter overnight. Some folks put it in the fridge. Just make sure you give it time to work. (And make sure no one throws it out!)
Next day: take the pieces out, rinse. If you have a rock tumbler, put them in that along with stainless steel shot, water to cover the pieces, and a drop of Dawn liquid detergent. Tumble for a while and check. The high spots should be cleaned and the recessed areas should be darkened. I found that I still needed to use a polishing cloth. And: copper is a soft metal, tumbling work-hardens it (think of the top of a tin can and how you bend it until it snaps; it snaps because it is too hard to bend).
If you don't have a tumbler: rinse, use 0000 steel wool, a brass brush, a toothbrush, a polishing cloth ( a jeweler's polishing cloth, such as the Moonshine cloth), and go at it. Work until you get the finish you want. Penny finds that the piece stays this color and has never had any problem with the copper oxydizing further.
Did you notice how dark the tubes and hooks were? Okay, go back and check the photo. Click on it and you will see the pieces up close. (While you're looking, I will take time to thank those artisans who posted this technique on Bead and Button magazine's Beader's forum. Everything you wanted to know but didn't know enough to ask about.)
Now, because I can't figure out how to put two photos in one post, the "after" photo will be in the next post. And i will include copper wire right off the spool.
So, now you have an idea of what a braider must do to decorate a braid.